If my son grows up to be a general contractor it would not surprise me one bit. He loves building things. The guys that work the lumbar aisles at Lowes know us by name because we're there so often. He's got lists made of all the supplies he'll need to make each and every one of his visions. (Like a house... a complete house... he's got everything from the roofing material to the toilets picked out!) Frequently part of my 'mom' role includes figuring out a nice compromise between his big idea and what we can really do. Today we made a house.
First I had my son make a drawing of what it he wanted to make. He quickly drew the outline of a three story house with a swimming pool and diving board.
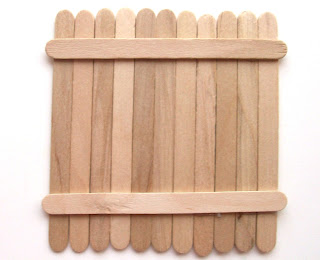
Popsicle sticks are one of the best building mediums to use when turning big ideas into reality. They're simple to assemble, relatively quick, and sturdy. I like to use a low temp hot gun to join the pieces. The downside is my kids aren't old enough to use it yet, but on the upside it dries quick so we can move on to the next step without waiting. We used this general frame pattern over and over.
We broke some of the sticks to make windows and doors. I held them tight at the spot I wanted to break with a pair of needle nose pliers and rocked the stick back and forth until it snapped. Then I cleaned up any jagged edges with a pair of shears. We had sand paper but didn't use it because it seemed like one too many steps to mess with.
We glued three sections together in a row to make the main part of the floor, then added the fourth back piece. Next came the walls, two of them have doors. It took several broken pieces stacked up to make the stairs. I brought out some left over shelf paper so we could "tile" the back room, turning it into the kitchen.
Here's three and a half of the starter sections glued together to make the second floor. The back section is tiled also because it's the bathroom.
Here's what the pieces of the swimming pool looked like before gluing them together.
And here's the swimming pool finished, attached to the side of the house. That piece sticking out on top of the second floor wall is a diving board. The thing standing off to the left is a grill. (How can you go swimming without grilling some grub to eat afterwards?)
Here's the other side of the house. The kids had fun painting a few of the finished sections while I glued more. A few stickers made it onto the walls too.
We "carpeted" the second and third floor with some scrap fleece. The green one is the boys bedroom and the blue one is the girls bedroom. My son wanted stairs to get to the third floor, but thankfully I was able to convince him that a ladder would be really neat. One set of stairs was plenty!
There's more shelf liner on the living room floor and the steps, giving the place those desirable hard wood floors everyone wants. It's decorated with a table and a garbage can. You can see the construction of the stairs a little closer in this picture.
This project took up most of the afternoon, so save it for when you've got plenty of time. Once you get started if your kids are anything like mine they'll just find more and more things they want to add to the project. I finally had to cut them off so I could get some dinner prepared. They were happy to just go to town playing with it, which they did right up until bedtime.


No comments:
Post a Comment